We wrote an article on how color coding can be useful for the organization for the “Your Organizing Business” blog. It aroused interest among readers, so we decided to share it on our blog too. The original version is here: https://organizedassistant.com/folder-marker/
All things need to be in order for effective work. In a regular lifetime, we position materials in colored boxes, color helps search among tons of information – since 80-85% of the population are visual creatures. At this point, why not try this technique in dealing with a PC?
Why can color coding be useful for us? Scientists explain:
“Color improves time performance […] and it is a very effective performance factor”
according to ACM
We subconsciously see this: refresh one’s memory on how you used markers of different colors to underline separate parts in texts? This helps you by sight split and recall distinct subject matters of the things you’re working with.
Let’s delve deeper into this topic and consider an example for professional organizers’ workflow.

- How to save information on the professional organizer’s PC more system?
- Instruction: how to organize projects/orders with the help of color coding
- Links for those who want to dive deeper into the color coding topic
- To sum up:
How to save information on the professional organizer’s PC more system?
Work with clients and deal with a dozen projects – are big parts of a professional organizer’s life. To quickly find information, you can develop a structure of the project folder. Save documents into it IMMEDIATELY as soon as they have been created or received. For instance, a Project folder can be consist of:
- consultation stage – discussions, invoices, needs assessment, organizing challenges, organizing package
- organizing process – make an appointment, on-site visit and hourly work to restore the order, set up the new systems, tips for future organization, issuing homework, provide recommendations for materials to best contain and organize belongings, a story from organizing techniques (process, system), and everything in between.
- maintenance – regular “checkup” calls or visits in order to keep your home at its well-organized peak
- financial part – control of prepayment-payment by the customer
- before/after – the project itself, then we need to present to future clients the part of your portfolio
- marketing – social media posts of projects, blog articles & art, etc.
So yeah, we have this organization inside our MyProjects folder (main folder):

While there are not a lot of projects, this is already sufficient. When the number of projects become more than a dozen – problems appear:

Not using the system, it’s like trying to find a polar bear in a snowstorm! We must distribute folders at different stages of readiness. Let’s make everything easier with the color coding: we will mark ready orders – in green color; in the process – in orange; not started – in blue; “on fire” – in red. It gives instant recognition when checking the monitor, tags needed folders for easy access, and arranges information.

Let’s see how we can do it…
Instruction: how to organize projects/orders with the help of color coding
- We need a method to color code folders fast. I use the color coding software, Folder Marker.

- Visit the foldermarker.com website and push the “Download”. Wait for downloading to end, install Folder Marker. Now you can change the color of an icon folder with 2 clicks:

- The contrast of colors will make our folders(projects) excel. Let’s achieved this with color coding:
- ready projects – in green;
- in the process – in orange;
- not started – in blue;
- urgent – in red.

- Once you have a new order/project – make a new sub-folder in the “MyProjects” icon folder for it. Right-click the folder, and you will see the popup menu with the Mark Folder entry. Choose Mark Folder, and then the color you want to apply because of the readiness of the documents inside the folder (“on fire”, in process, not started, ready). Because it’s a new order from a client, not started yet – we apply blue. The color is added to the chosen icon folder. Eventually, the color of the folder can be changed, when we will start to work (orange), then finish the order (green), or dates have changed and we need to finish very urgently (red).

- Rename icon folders accessible. It can be the name/surname of the customer, the date when it must be ready, or some additional details.

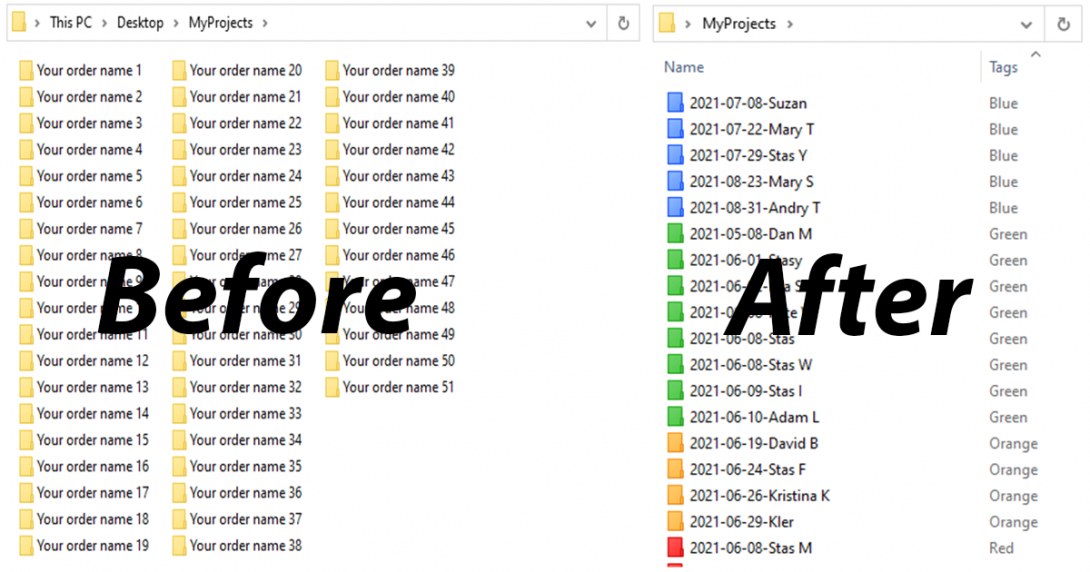
The result we have:

What have we got after this stage? Thanks to the colors we have added one more visual layer for accessibility + we can yet see project folders, deadlines, and client names/surnames: one look is enough to see which projects have not even started and which are “on fire”.
This method can be useful both for yourself and for your clients’ orders because everybody needs the organization on a desktop. Perhaps putting things in order on the client’s computer can even be on the list of services that you offer?
How to find folders even quicker?
After you’ve done the color coding with Folder Marker, you can filter/sort colored icon folders by color. This is an exceptional ability I didn’t find in others alike software. It helps to search needed colored icon folders in seconds. But at first glance it isn’t so obvious how to use it, so let me teach you little by little.
We color coded all folders showing the work process. What is after that?
- Just open the “MyProjects” folder and switch to Table view (View tab -> Table view).
- Right-click on the header (space where you see Type, Name, Size, etc.) and tick Tags. A new column appears – “Tags”.

- Click on a “Tags” column and see that icon folders are sorted by color.
The result we have:

- We also can filter content to present some specific color(-s). For example, if you need to see “on fire” (=red) projects, click on the arrow near “Tags” and tick “Red”. Folders appear. It is working this way 🙂

Links for those who want to dive deeper into the color coding topic
Presenting the status of the order is just one thought. Some more ideas: you can have your own system by prioritizing, by thematic, by importance, by splitting your electronic desktop for blocks, etc.
These are a couple of articles that can give you new ways of creating your labeling system:
To sum up:
Color coding enhances productivity on the desktop. It adds a color layer to present the documents on a PC in a more ordered way and accelerates document management. Color sorting/ color filtering can be a supplement to your structured process!

